
Are you getting close to the limit of your storage capacity? SSDs are practical when it comes to speed and reliability. Because they contain no moving parts, unlike traditional HDDs, they are less prone to mechanical damage. On the other hand, they are still rather expensive even today, so manufacturers fit their computers with base capacities that aren't particularly generous. The solution is to buy a model with a higher capacity or to replace the SSD with a new, higher-capacity one. Or to learn to manage your data well.
There are quite a few ways to handle your data and free space. The simplest is cloud services, where you can put away both documents and photos. For this, Apple offers its own iCloud. When you need more space, rarely used files, photos, videos and e-mail attachments are automatically stored in iCloud. All the files stay where they are in the cloud, and when you open them they download again. Your most recently used files stay on the Mac, along with optimised versions of your photos.
Your Mac will itself walk you through the quickest ways to save space on a MacBook. It shows you how much capacity is used/free and how to save space quickly. How do you do it?

How to optimise your Mac's storage
Step 1: Check your free capacity and the options for freeing up space
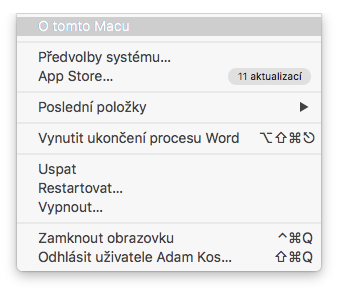
- Click the Apple logo at the top left of the menu bar. It makes no difference whether you have a MacBook, iMac, Mac mini or Mac Pro.
- Choose About This Mac to display information about the computer.
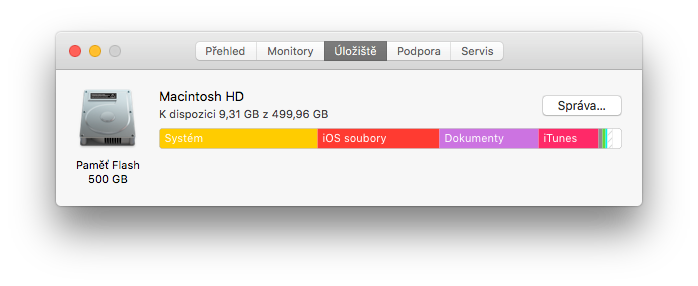
- Here, switch to Storage. After a moment's calculating, you'll see an overview of the available storage and the space taken up by files in various categories.
- Running low on free space? Then choose Manage.
- Once you click it, it offers you recommendations for optimising your free space. If you're already using some of the recommendations, you'll see that many fewer. By default there are four options here: Store in iCloud, Optimise Storage, Empty Bin Automatically and Reduce Clutter
The basic overview tells you which data is taking up the most space:
The next steps are to make use of the options on offer. What do they do, and why use them?
Step 2: Store in iCloud
- Once this is turned on, all the files you keep on your Desktop and in Documents will from now on be stored in iCloud Drive.
- When more space is needed, only the most recently opened files stay on the Mac, so that you can easily work with them offline.
- Why is this a good thing? You not only save space on your computer's disk, you also have all your files backed up at the same time. And that is something we definitely recommend, because losing a computer often doesn't hurt as much as losing valuable files or family photos.
- How can you tell which files are in iCloud and which are stored locally? They are shown with the corresponding icon (for those in iCloud, it's a cloud with an arrow). Double-click it to download the original file.
- iCloud is also ideal for storing full-resolution photos and videos. When more space is needed, only reduced (optimised) versions of the photos stay on the Mac. You can still download the original photo or video from the cloud simply by opening it.
- Message attachments can be stored in iCloud too, however. Here again, only the messages and attachments you've opened recently stay on the Mac.
- You get 5 GB of space free of charge; more space is paid for. iCloud storage plans start at 50 GB for 25 Kč a month, and you can buy additional space directly from your device. At that price, getting space and a backup of your data in one is really worth it.
Step 3: Optimise Storage
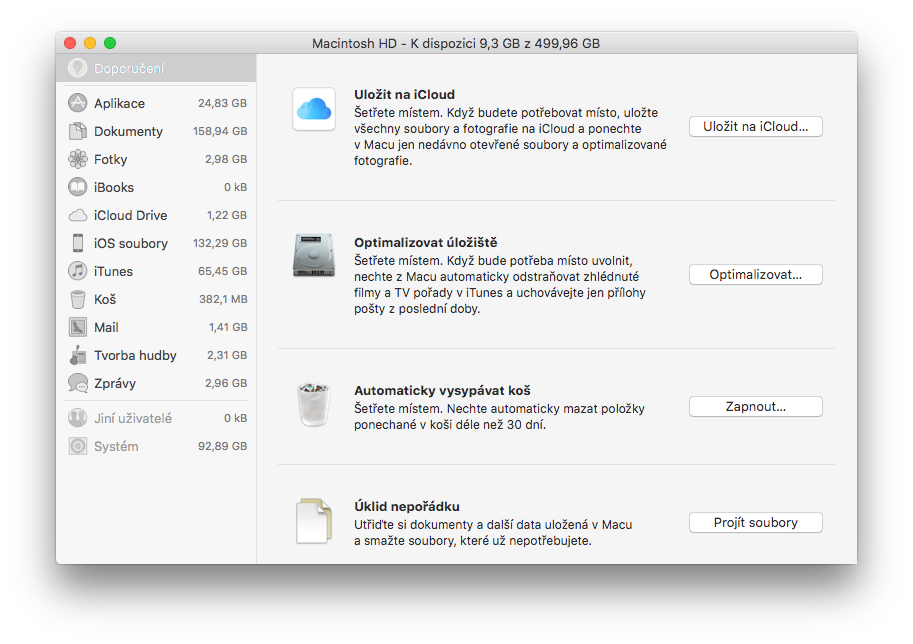
- This option offers automatic removal of films and TV programmes you've already watched. It works in conjunction with the iTunes app, which is where they are downloaded. However, it only happens once you start running out of storage space, and only if you really have watched the film or programme in question. It's also useful if you simply never delete old videos you've already seen.
- With this setting you also optimise the Mail app, which is a big data hog. With this setting, it will automatically download only the attachments you've received recently. You can still download any attachment at any time, though. All you have to do is open the attachment or the e-mail it belongs to. If, however, you choose Don't automatically download attachments here, only the attachments of e-mails you open will be downloaded. That saves even more space.
Step 4: Empty Bin Automatically
- You may laugh, but you'd be surprised how much data piles up in people's Bin.
- Emptying the Bin automatically permanently deletes only those files that have been in it for more than 30 days. So you needn't worry about deleting something you might need later. If you haven't reached for the data within 30 days, you really are unlikely to need it any more.
Step 5: Reduce Clutter
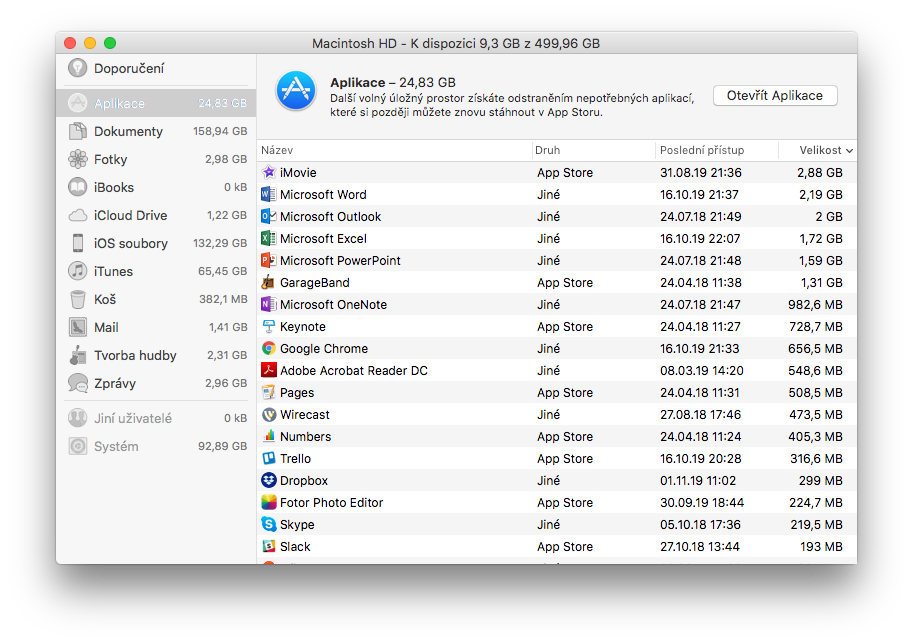
- The Reduce Clutter feature helps you find large files and files you may no longer need.
- Click the Review Files button
- In the sidebar, pick file categories – for example Applications, Documents, GarageBand, Music Creation or Bin. In some categories you can delete files directly; other categories only show the total amount of space taken up by a given app's files. You can, however, open the app straight from here and delete the files from within it.
- On the left side of the panel you can go through the individual items and delete unneeded files in them. The one named iOS Files, for example, may contain old backups of mobile devices you stopped using long ago or don't even own any more.
- In macOS Sierra or later, however, your Mac automatically takes further steps to save space, because it detects duplicate downloads in Safari by itself and keeps only their latest version. It also reminds you to delete used app installers, removes old fonts, languages and dictionaries you no longer use and, when more space is needed, clears caches, logs and other unnecessary data.
Step 6: Further optimisation steps
Above we cover the optimisation options your computer itself offers. Even without these features, we recommend:
- Sorting out your music, films and media – filter your storage for these file types. No longer listen to that artist? Already watched those films? Out they go.
- Checking the Downloads folder regularly – a lot of unneeded clutter often hides there. Throw what you don't need into the Bin and empty it.
- Compressing files
- Moving archive data to external storage, etc.
Step 7: Regular Mac maintenance for speed and performance
Optimising your storage not only frees up space, it also makes the computer faster. A "cluttered" computer will never run at its best. For better performance and a longer life for your computer, we also recommend:
- Regular physical cleaning – you've cleaned up your data. But can you imagine how much dust and dirt from your hands gets into your computer? That, too, can do a computer a good deal of harm. Just as we take the car to the car wash, a computer deserves regular cleaning as well. What's more, a specialist can get into places you will never reach with a duster (connectors and the like)
- A software or hardware upgrade – if your computer still suits you, there's no need to buy a new model straight away every time. Does the computer seem slow even after you've cleaned up the storage? Try asking a specialist whether an upgrade would do it good and how worthwhile it is compared with a new computer
How much does professional physical cleaning cost?
Here at appleguru.cz we carry out a complete MacBook clean from 490 Kč. Come and see us! We specialise in Apple products.
✆ 607 855 558
✉ info@appleguru.cz
Seifertova 683/83, Prague 3 – Žižkov
you can also conveniently send us your device by courier