

There are two ways to transfer photos from your iOS device to a computer. So first of all, it's a good idea to decide which method you're going to use:
- iCloud – using the cloud is more convenient and, above all, it runs automatically after the initial setup. You just need to be connected to the internet.
- Cable – the good old cable works too. Especially for one-off transfers, or if you're not a fan of cloud services.
We recommend using iCloud to transfer photos to your computer
What are the advantages?
- iCloud works on all devices. You can get to your pictures in iCloud Photos on your iPhone, iPad, iPod touch, Mac and Apple TV, on the iCloud.com website and even on a Windows PC.
- It works automatically. All new pictures are added to iCloud Photos automatically, and any edits or changes to how they're organised show up on all your devices. Which is really convenient, because once you've turned the service on, you don't have to look after anything any more.
- You're backed up. Do you know what hurts users most when they lose data? Losing their family photos. A cloud service is an automatic backup of your memories.
- It's free. The iCloud service is free. Only if your library already holds thousands of pictures, or you often shoot video, will you need to buy extra cloud storage.
Practical tips before you use iCloud
- Make sure you have the latest software installed on all your devices.
- Set up iCloud on all your devices.
- If you have a PC, download iCloud for Windows.
- Make sure that on all your devices you're signed in to iCloud with the same Apple ID.
- Make sure you're connected to Wi-Fi, because a really large amount of data is going to be transferred.
TIP: Need to move photos, contacts or other data from an Android device to an iOS device? Read our guide to transferring data from Android to iPhone.
Setting up iCloud on an iPhone, iPad or iPod touch
Go to Settings -> [your name] -> iCloud -> Photos and turn on iCloud Photos.
Slide the switch to turn on iCloud Photos on your iOS device.

Setting up iCloud on a Mac
Open System Preferences -> iCloud.
Next to Photos, click Options and select iCloud Photos.
On Apple TV, go to Settings -> Accounts -> iCloud -> iCloud Photos.
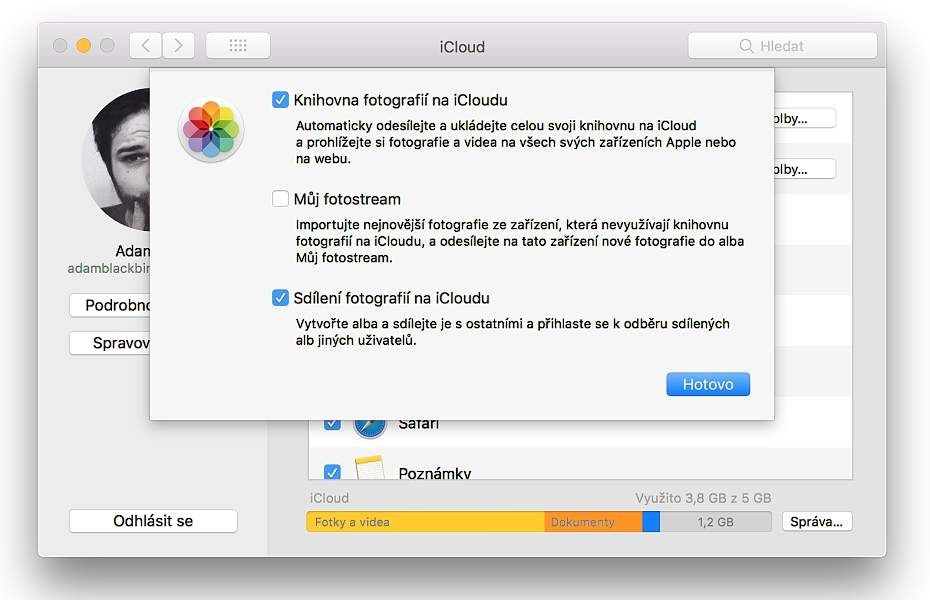
Troubleshooting:
- Have you synced photos to your iOS device with iTunes in the past? When you set up iCloud, you'll probably see the following warning: “Photos and Videos Synced from iTunes will be Removed”. Photos and videos synced from your computer stay on the computer, but they're deleted from the iOS device. There's no need to worry, though.
To get them back onto your iOS device, turn on iCloud Photos on your Mac or PC. When you do, the photos from your computer are automatically uploaded to iCloud so that you can access them from all your devices. With iCloud Photos turned on, all your photos are stored in iCloud and available in the Photos app on your Mac or in a folder of your choice on your PC.
Importing from an iOS device to a Mac with a cable
If you don't want to use the cloud, you can transfer photos and videos the classic way, by connecting a cable. To import photos to an Apple computer, you can use either of two apps:
- Image Capture (you'll find it in Launchpad, in the Other folder) – simpler, but less clearly laid out
- Photos – a slightly more complex app, but better suited to transferring photos
The Image Capture app
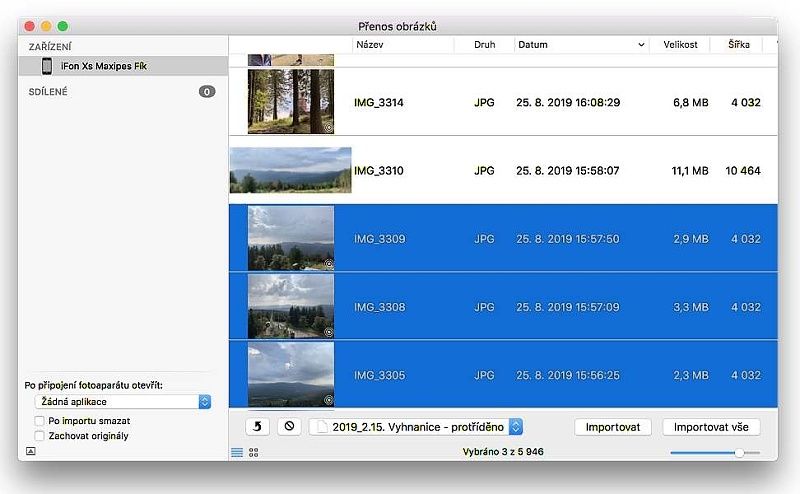
All you need to do is connect the iOS device to the Mac with a cable, launch the app, select the photos and choose Import. You can also go for Import All.
Picture: Before you start the import in Image Capture, it's a good idea to set the destination folder where the media should be saved.
The Photos app
If you choose the Photos app, you may need to unlock the iOS device with its passcode. The iOS device may also show a prompt asking you to confirm that you trust the connected computer. Naturally, tap Trust to continue.
With a device connected (which can just as well be a memory card) and the Photos app open, you land straight on the import screen. If you want to import only selected photos, click the items you want and then click the Import Selected button. If you want to import all new photos, click Import All New Photos.
The options at the top right let you import either just the selected pictures or absolutely all the ones you don't yet have on your computer.
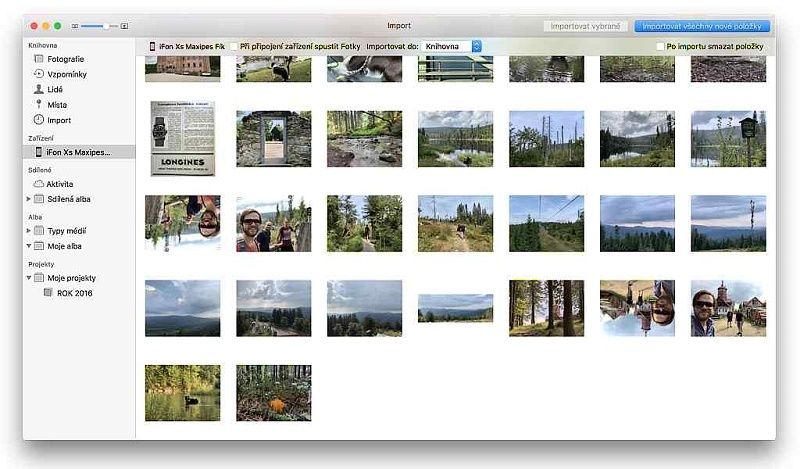
The difference here is that you don't need to care where the photos are physically saved, because you'll always find them in this app. On macOS High Sierra or later, imported photos appear in the Imports album in the Photos app. If you're using an earlier version of macOS, you'll find them in the Last Import album.
Having trouble transferring your photos properly? Come and see us! We specialise in Apple products.
✆ 607 855 558
✉ info@appleguru.cz
Seifertova 683/83, Prague 3 – Žižkov